Your cart is currently empty!
Lesson Two: Focus & Exposure

Welcome to your second lesson! I’m so excited you’re here!! Now that you know the basic functions of your iPhone, let’s dive right into focus and exposure!
Focus
Have you ever had photos turn out blurry and you’re either not sure why, or keep getting blurry images? Here are a few tips on getting sharp focus with your iPhone.
- CLEAN YOUR LENS. I see so MANY iPhone pictures posted to social media and they are extremely fogged out. I mean, it looks like people just ate French fries, touched their lens and snapped away! HAHA…Let’s not make that mistake. Rule number 1…Wipe your lens…like really really well. I usually use a cloth, and even get it a little wet first and then wipe it. Really get that glass clean every single time you shoot. Also make sure you blow it first before cleaning if you think sand or dirt could be on it to avoid scratching the glass before wiping! But, get in the habit of cleaning that lens.
- HOLD IT STEADY. Movement can cause blurry images especially in lower lighting situations. Keeping your iPhone as steady as possible equals sharp images! You can support the phone with two hands while shooting, if you’re getting a low angle shot, support your elbow on your knee, rest your arm on a table…whatever it is, extra support to keep your phone steady helps to get those tack sharp images.
- SET FOCUS YOURSELF. Just like with my big camera, I set focus myself by toggling the focus point in the camera to my desired location. I’m always shifting the toggle and setting it myself. It’s the same with an iPhone! All you need to do is touch on the screen where you want the camera to focus! If you want the focus to STAY there, hold it for a few more seconds until the AE/AF yellow words appear at the top of your screen. At the same time on the right side of the yellow empty focus box a small picture of a sun will appear. When it does you can then slide your finger up and down to set the proper exposure for the setting!
* Bonus tip *
Bouncing focus issues— ever have your iPhone choose the wrong places to focus when you’re taking photos? If the person or subject that you’re trying to focus on is hard to get the camera to actually focus on, is at a far distance, has people walking in front of them, or has confusing lighting for your iPhone (meaning it’s having a hard time getting to focus exactly where you want it to be)…all you need to do is zoom in on your subject really close, hold your finger down on that subject to lock focus on them and then zoom back out! Now your subject will always be in focus no matter what happens in front or around them! The iPhone won’t bounce focus around! Problem solved! YAY!
EXPOSURE

When I first was learning photography almost eight years ago now, I learned that lenses are just like eyes and that analogy has stuck with me ever since. Have you ever watched a cats pupil expand and contract? Well a lens is exactly the same. In a bright situation when a lot of light is entering the lens the lens contracts. In a darker situation when there is not a lot of light the lens opens up to let more light enter in….just like how God created the eye! Pretty neat huh? As budding creative photographers I encourage you to start to pay attention to light; light in all its forms!
Speaking of light, lets discuss these two forms of light real quick:
Soft light– is light that usually wraps around individuals and doesn’t cast shadows; doesn’t have hard transitions
Examples of soft light

Notice how the light just wraps around at the individual and there are no harsh shadows?
Examples of hard light
Notice the hard shadows cast. The light hits the individual and creates a very distinct and hard shadow or break in the light.
I want you to start paying attention to light around you. Start to notice soft light and hard light in your every day and in your home. This attention to detail and light will help you further in our lessons… Now back to exposure…
So, when we’re talking about choosing the proper exposure for our images, we’re choosing how much light we’re allowing into the lens– makes sense?
There’s a rule about photography that you need to know before starting to choose exposure:
It’s better to underexpose an images than overexpose an image.
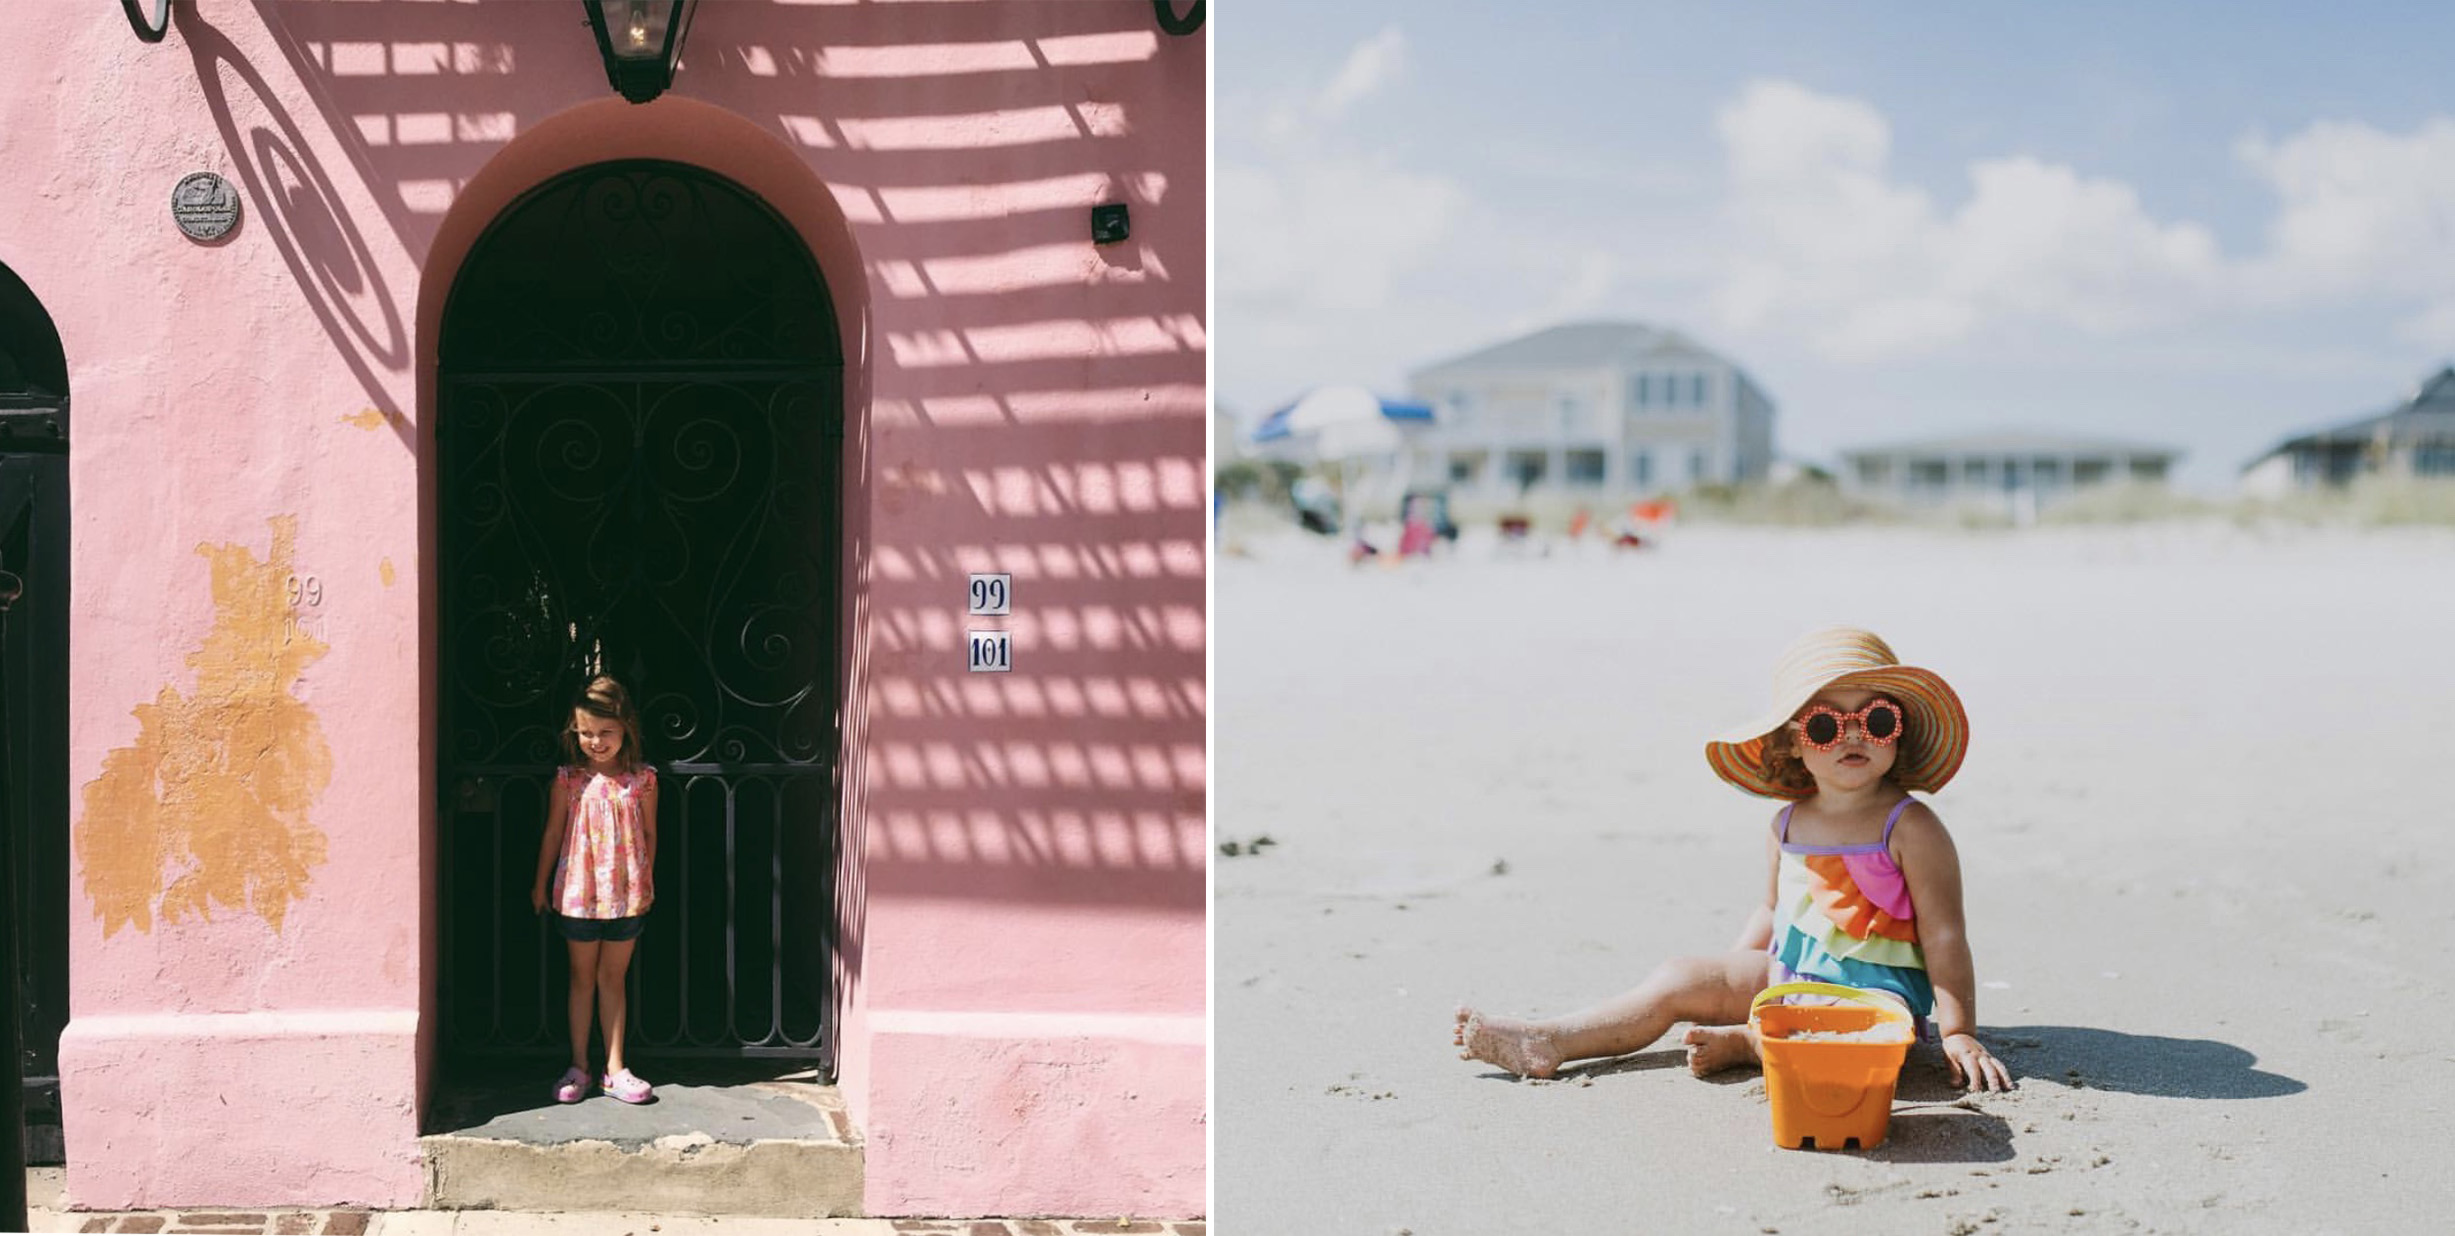
Why you ask? Well, we call images that are really bright “blown out”. Meaning the details start to become lost due to how over exposed areas of the images are. It’s extremely hard to get those details back in post processing (editing). 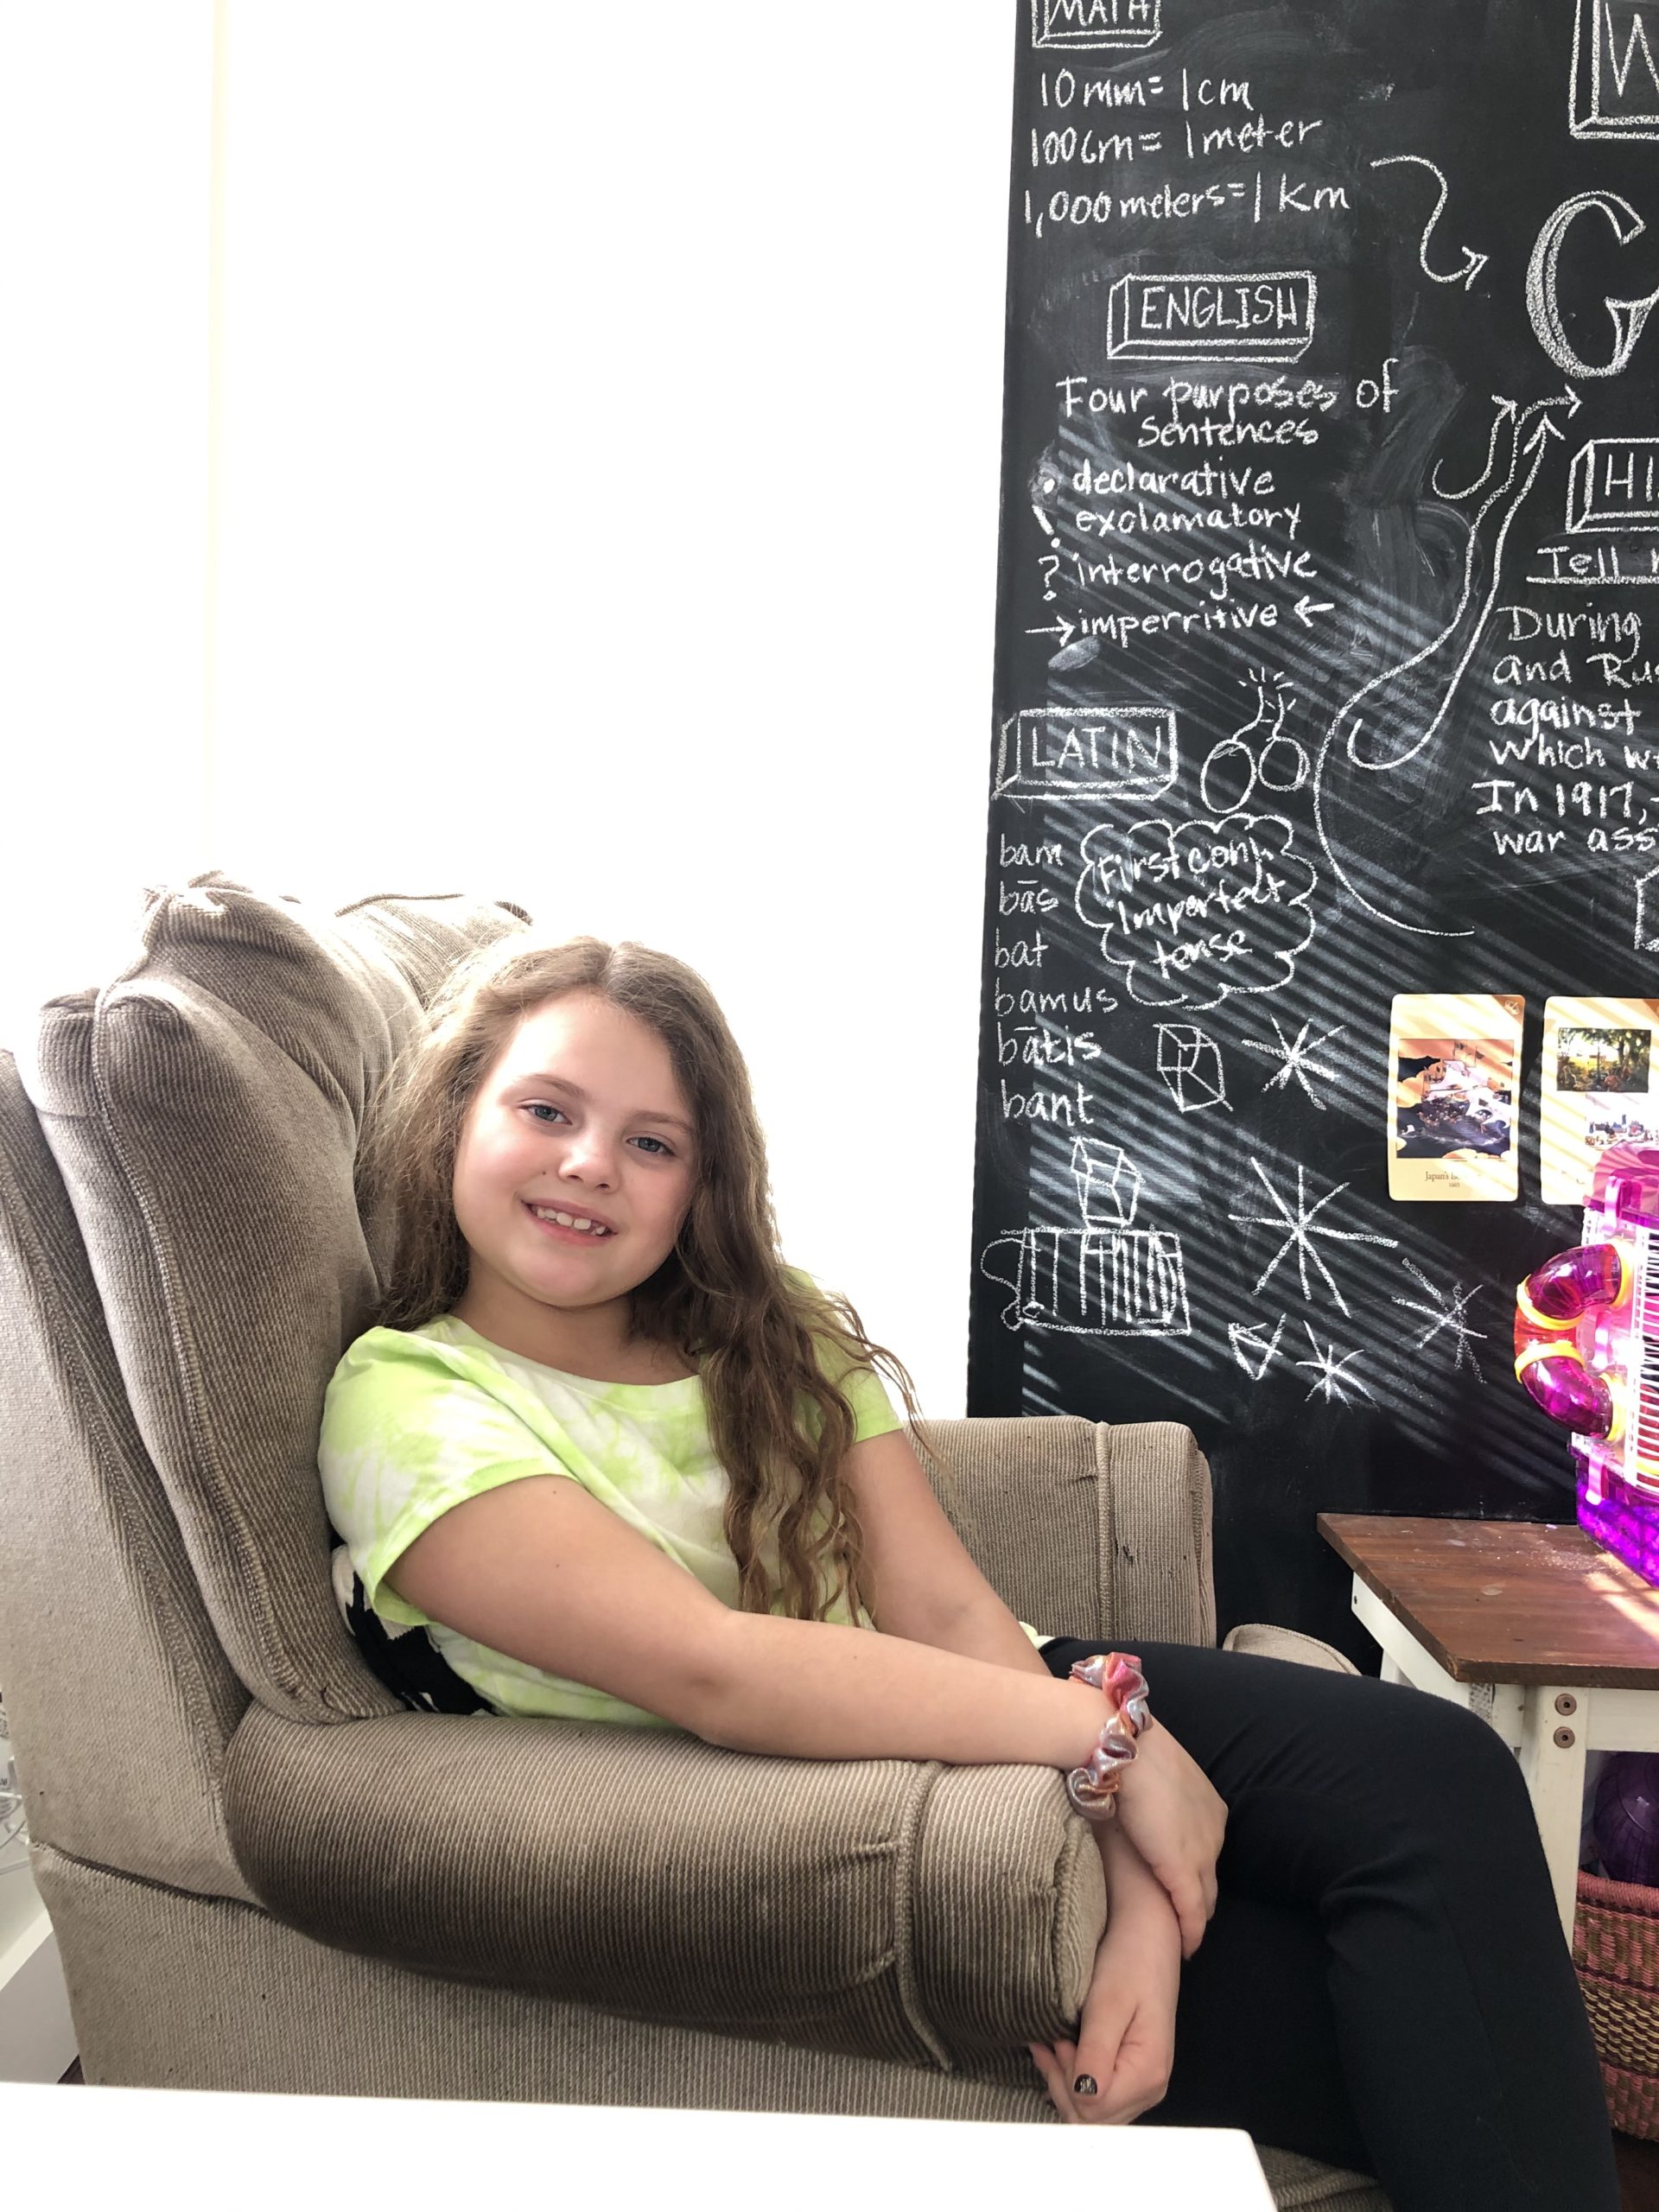
The photo on the left has very blown out areas if you can see in the top left hand side of the photo and on Gracie’s face. Blown out areas are actually a lack of data that the camera recorded. If there’s a lack of data–meaning there’s no data in that area of the photo–then there’s no recovering it in post processing. Make sense?
That’s why…
Underexposing your images is far better than overexposing.
As a matter of fact I actually intentionally underexpose my images in my professional work so I can retain details (usually in clouds and skies and lighter parts of the scenery) that would normally be lost if I shot at a “normal” to the eye exposure setting. So keep that in mind when choosing your exposure settings!
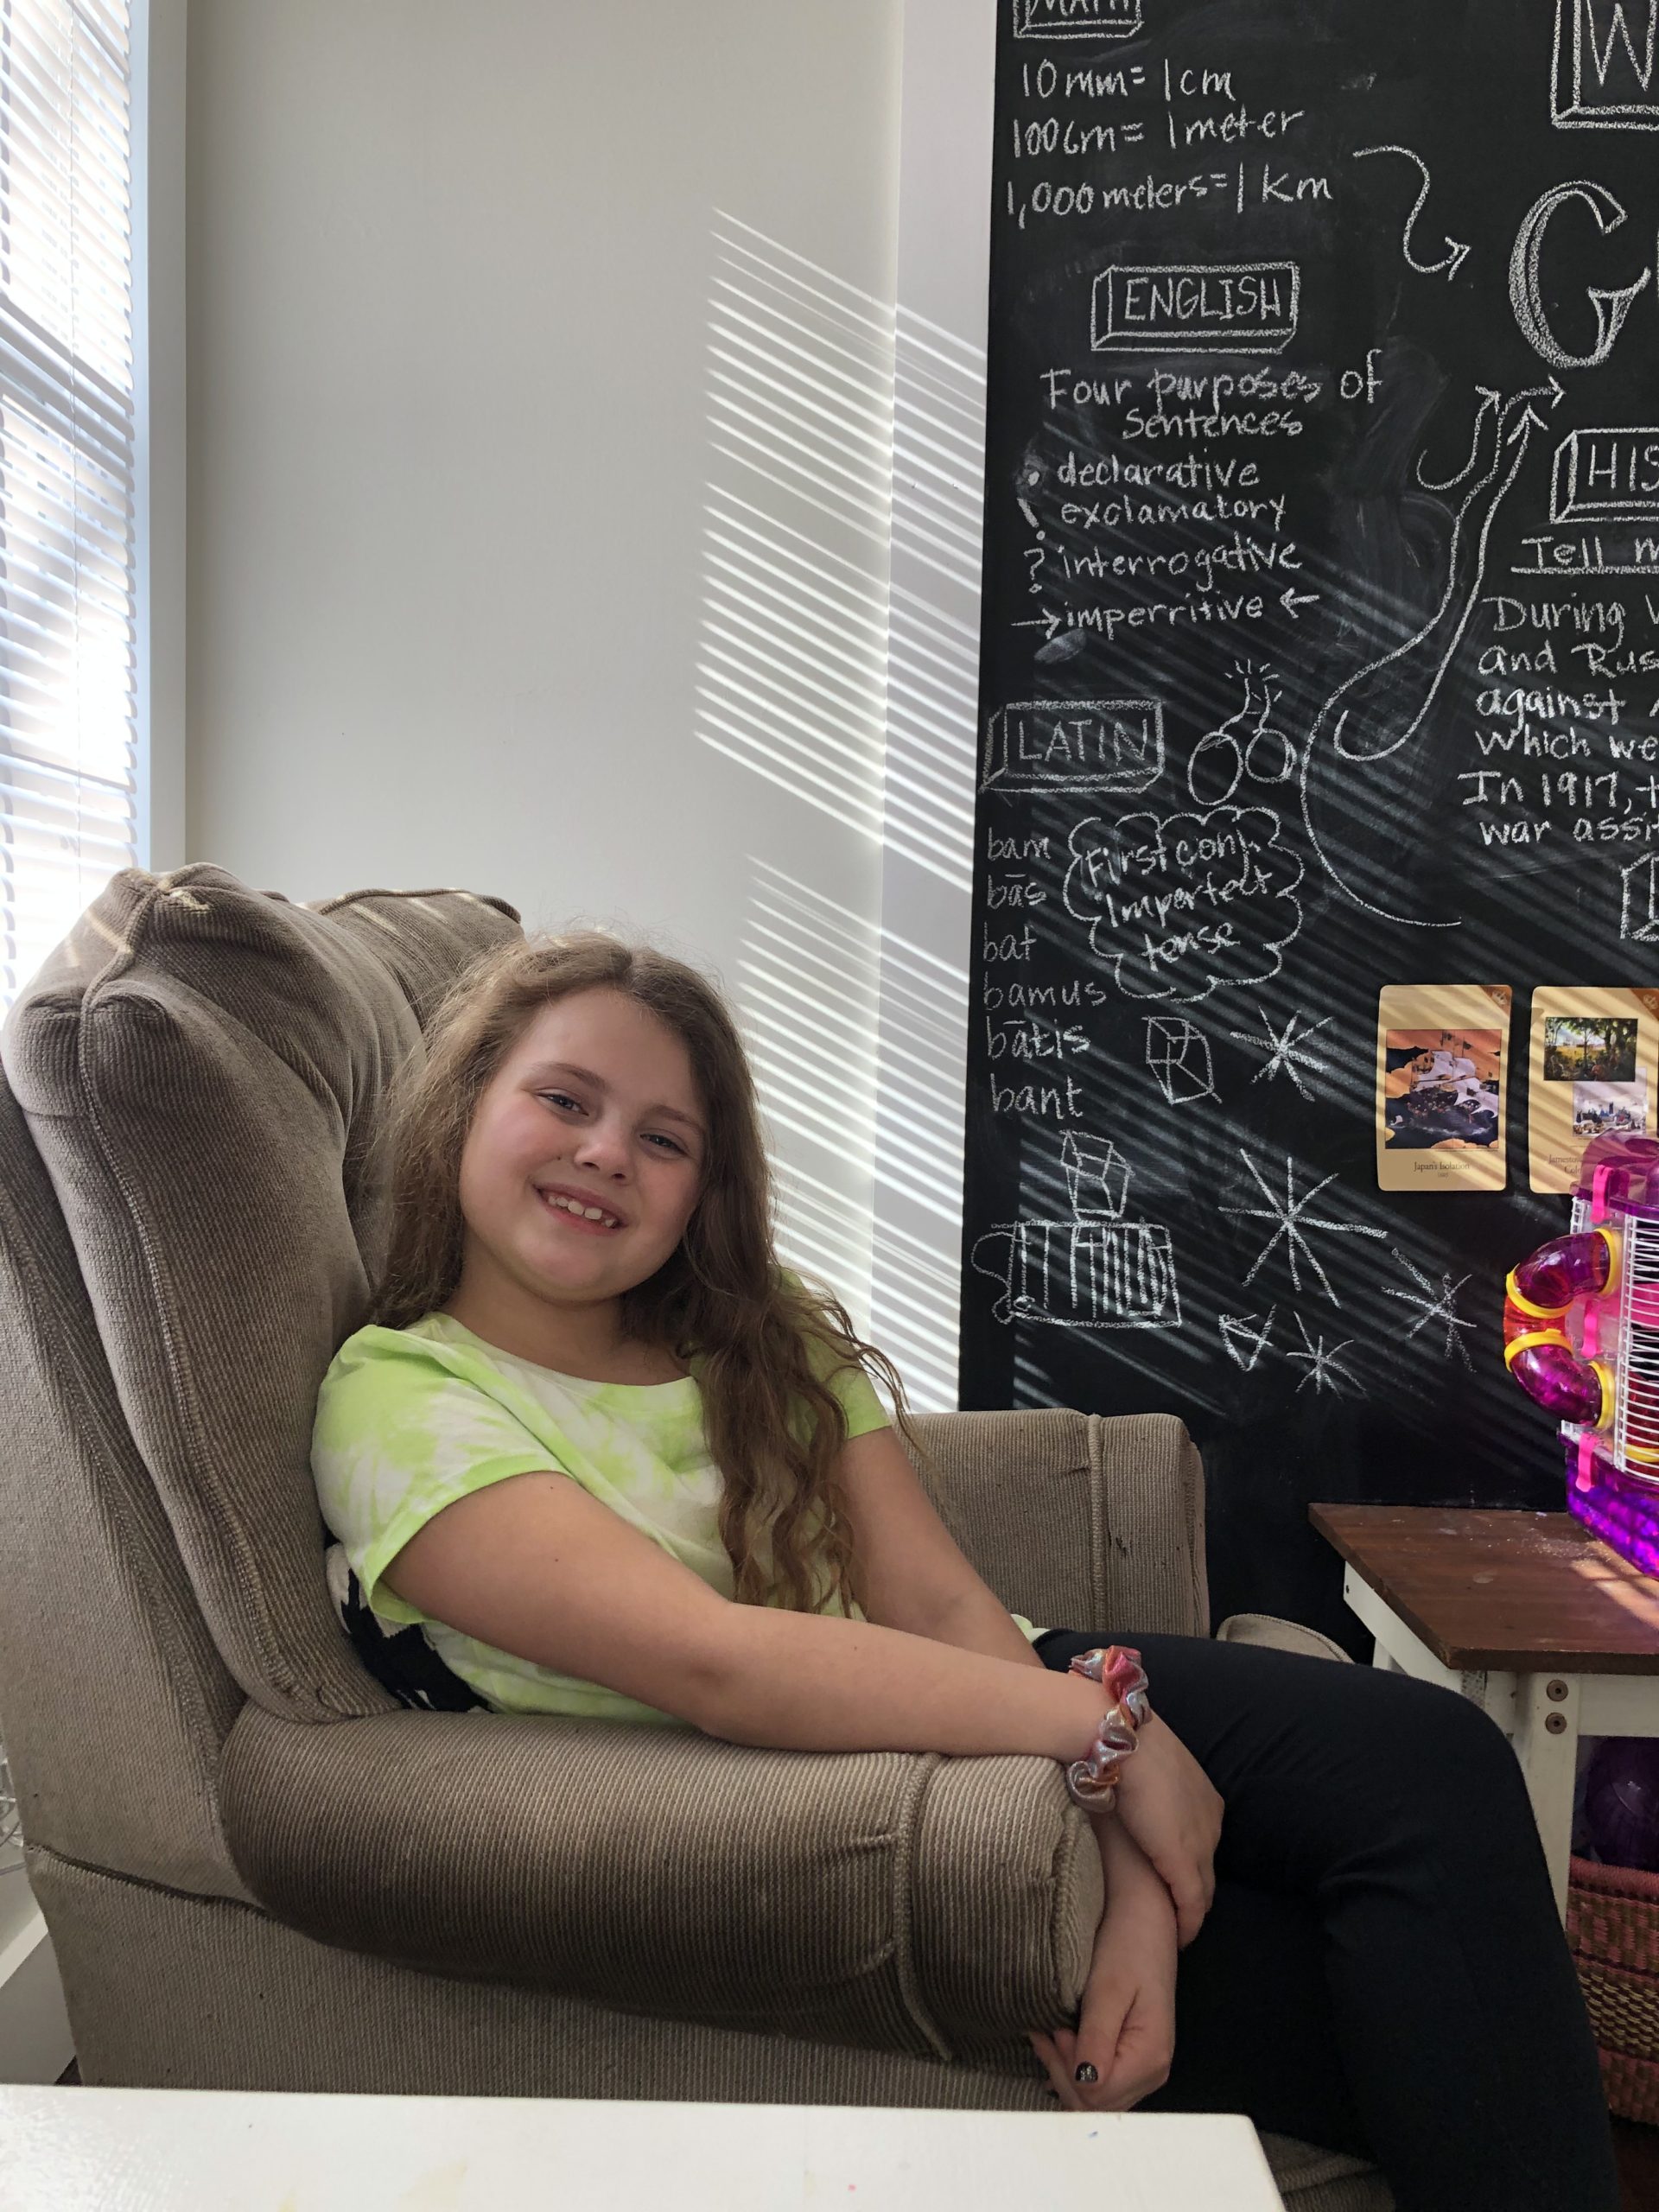
In the second image, you can now see the widow, the details of the light streaming through the blinds, the chalk board boarder. The lighter areas are no longer “blown out” and data is now where it once wasn’t in the previous image.
A properly exposed image will not have any blown out highlight areas. If you have to decide between an image with blown out highlights and a darker image, usually the correct choice would be the underexposed because the blown out image hasn’t saved any detail or information and you cannot recover any areas in those blown out areas. You can always brighten shadows and the overall exposure in post processing.
How to properly expose a photo on your phone:
When trying to find the proper exposure for an image, remember the rule that it’s better to underexpose an image. REMEMBER: You DO NOT want any “blown out” areas in any of your photos! Darken or lighten an image to find that perfect balance.
Before we start, try this: Hold your phone up with the camera on facing a brighter area like a place with a window or door light coming in. Tap the screen in the darkest part of your photo. What happened? It immediately brightened? Now tap in the brightest part. What happened? It immediately darkened? Going back to the first part of the lesson about a lens being similar to an eye; you just figuratively opened and closed the “pupil” or your cameras “eye”! By tapping the bright and dark areas you opened the lens to let more light in and closed the lens to keep more light out. This exercise shows you the extremes of your exposure. The super overexposed and the super underexposed. Ideally you want to find the happy middle!
How do you achieve proper focus AND exposure:
- Tap your finger on the part of the image you want your focus to be. Lock that focus in so AE/AF pops up. Did an area become blown out? Too dark? That’s ok!
- Now, adjust your exposure by moving the sun icon that appeared to the right of the focus box. Adjust exposure to fix those blown out highlights or darkened places! Try and find that happy medium.
Now you have the focus in the right spot, but also the exposure honed in!!! Pretty cool huh?!
Get that natural light in…
My last thoughts about exposure is to always remember to let in as much natural light as possible into a room. Open those blinds, turn all the artificial light off (natural light and artificial light don’t mix well) and get things as bright as possible using natural light!


Here’s an example the power of just letting in natural light into your house! Both unedited images, see what the impact of letting natural light into your house!?
RECAP
Lets recap what we learned in today’s lesson:
1 We talked about focus: clean our lens as a habit; hold your camera steady especially in dimmer lighting; set that focus yourself!
2. We mentioned zooming in real close on a subject to set focus when your iPhone is having a hard time keeping focus where you want it.
3. We chatted about the definition of exposure–which is how much light we are letting into the lens of our iPhones – similar to that of an eye!
4. We discussed the hard-edges shadows of hard light, and how soft light wraps around people and things.
5. We discussed how its better to underexpose than overexpose an image. The blown out highlights are actually not holding any information-thats why you can’t recover details from them!
6. And finally we discussed how to set exposure and focus separately, achieving the exact place you want focused in on; and the proper exposure for the image!
Homework
- This week I want you to start paying attention to lighting. Look for soft and hard light in your home, while you’re running errands, at a soccer game; whatever and it is. Every day I get hard light at 4:00 in my front room. Things like that…start looking for it. Once you start to notice those lighting opportunities it starts to feed into your creativity and you can better prepare for those creative moments (we dive into this deeper in future lessons).
- Practice setting focus and exposure and post to the Facebook group! bonus points if you use soft or hard light in your photo